Versions Compared

Key

  • This line was added.
  • This line was removed.
  • Formatting was changed.
  • Required extension numbers must be set up on the SIP server before you begin. Refer to your SIP server documentation.
  • Open the Core Configuration Manager (CCM): input the IP address of the LQ unit (found in the device front panel screen) into the address field of a browser that is on the same network as the LQ unit. Password and Username: admin, admin.
  • For more detailed information on physically connecting devices, see Chapter 4. Basic set up (LAN) in the LQ user manual.
  • If you don’t have, or have not yet activated a license for SIP, you will not be able to generate SIP ports in the Accounts page of the CCM.

...

Expand
titleDemonstration: Program the CCM
  1. Navigate to the Accounts page of the CCM and define the SIP server. Click image to enlarge/minimize  Image Modified
    Note: You need to configure the Domain setting if your PBX is set up to work with more than one domain. Configuring the domain in the CCM is recommended as the PBX may have only one domain, but this can change. Please refer to your network and PBX administration if you need advice on this.
  2. Register SIP clients. Give the LQ unit the Username and Password of an extension already set up in the SIP server. Assign this user extension to an LQ unit to register the client with the LQ. Register up to 8 SIP clients on each LQ device.
    Click image to enlarge/minimize
      Image Modified

    Note: If the registration process times out the LQ will re-register. The unit renews registration every 5 minutes.
  3. Successful registration is indicated. If registration is not successful, click the registration indicator for information.
  4. Once registered to an LQ unit, SIP telephone lines are seen under the device icon in the left side of the Assignments page.Click image to enlarge/minimize Image Modified
  5. Go to the Assignments page of the CCM. Bring both the External port and the SIP port together in a Channel. Click image to enlarge/minimize  Image Modified
    Audio sources are now connected in a Partyline (conference) setup. You can dial into Channel 1 from an external phone and dial out from Channel 1 using the CCM.


Expand
titleMaking and accepting calls: LQ SIP standalone

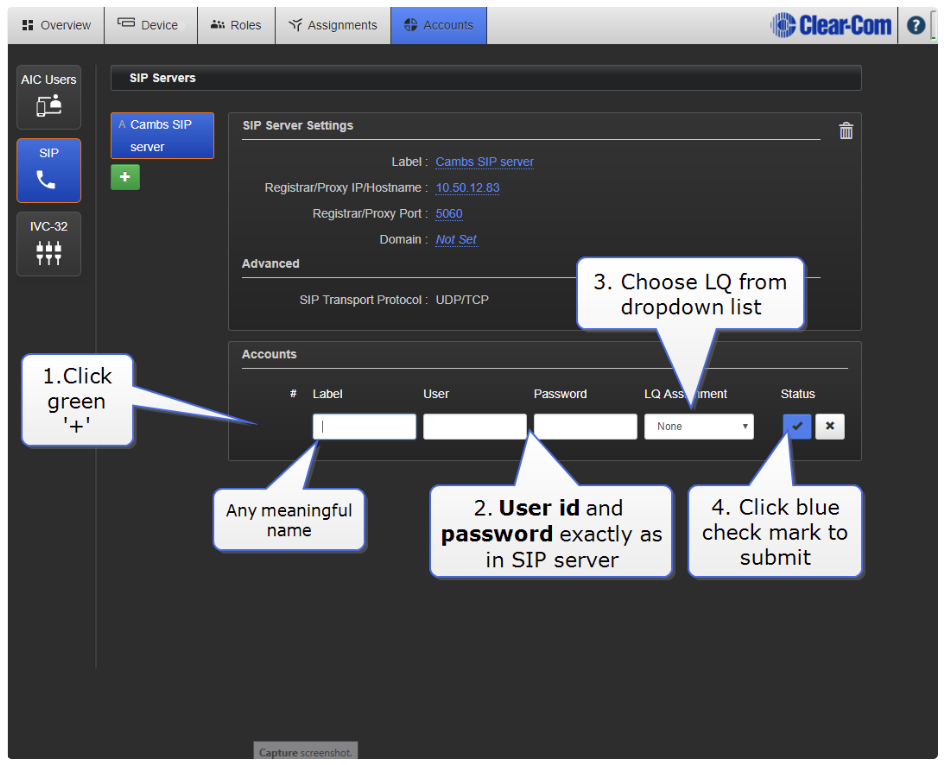
Note: The SIP enabled port MUST be put in a Channel before you can make and accept calls.

  • Accept incoming calls

    1. If an external user (for example x.2005) dials into the LQ-SIP line then the LQ unit will auto-answer and establish the call. Audio will then pass between all members of the Channel associated with the SIP line.
    2. The CCM will show the incoming caller number.
    3. The CCM user can hang up the call by selecting the phone icon and hanging up.
  • Use the CCM to dial out: Click image to enlarge/minimize 

    1. Type in the dial-out window the phone number or address of the telephoneline/extension you want to reach.
    2. Once the call is established, audio will pass between all members of the Channel associated with the SIP line.
    3. The CCM will show the dialed phone number.
    4. The CCM user can hang up the call by selecting the phone icon and hanging up.

Note: SIP calls can also be hung up (ended) from the LQ device front panel menu.

Note: You can define as many SIP clients as you need, but only 8 can be registered (connected to an LQ device) at any one time.

Note: SIP line connection status bars: green; connected, yellow; connecting, connections pending.

Note: You will see a VOX light in the Assignments page. This lights green when audio is coming from a port.

...