Yay.com
Using Yay.com Cloud based SIP PBX with LQ and Eclipse HX
There are a number of stages to configuring this useful feature:
- Configure your cloud based service.
- Linking your LQ device with the SIP accounts
- Linking your Eclipse HX matrix to the LQ (in this example we use IP but 4 wire is also possible)
- Creating the internal audio and data link between the SIP account and the Eclipse HX.
Prerequisites:
- com Account with Direct Dial Number
- LQ with 1 or More SIP Licenses
- Reliable Internet connection
- Configure your cloud based service.
Configuring a Yay.com SIP account is a very simple process and this process is similar for all online SIP service providers.
Firstly go to the website www.yay.com and create an account. Once the account is created you need to add Users.
In the case of SIP a user is equivalent to an extension number on a traditional PBX telephone system.
In our example here there are two users configured. User 4041 and 4042. Both exist under the same account and both have external DDI or direct dial numbers which means I can pickup any phone and dial the full DDI number and the relevant user will receive my call. DDI numbers are normally a chargeable feature for each user billed to the account.
NB many service providers don’t stick to standard naming conventions and this can get confusing.
Below is a screen capture from our Yay.com Accounts page showing the first of the users:

Here you can see several important Pieces of information:
- SIP Username (required for LQ Login)
- Number to Present (This is our DDI or direct number)
- Password (required for LQ Login)
The last important piece of information is the Domain. This varies depending on your cloud SIP service provider. For Yay.com the Domain is:
2. Linking your LQ device with the SIP accounts
Log into your LQ device and go to the Accounts page. On Left hand side click the +. This will create a new blank SIP Server. Fill in the relevant details in the top section. In our case the details – which we took from our Yay.com accounts/user page are as follows:
- Label: SIP1 (this is internal to LQ only)
- Registrar/Proxy/Hostname: talk.yay.com
- Registrar/Proxy Port: 5060 (this is a default)
- Domain: talk.yay.com

It should now look like this:

Now we will add our User accounts:
Click on the + in the lower Accounts section.
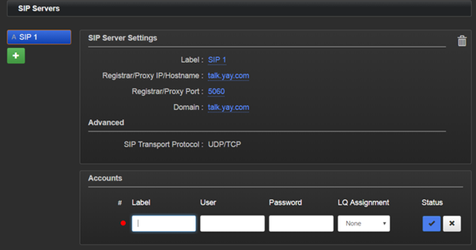
Fill in the details with information from our Yay.com Accounts Page:
- Label: Yay 4041 (This is internal only – I like to put the DDI number here)
- User: CC4041 (From the Yay.com accounts page – this is the username for 4041)
- Password: O41I (From the Yay.com accounts page – this is the password for 4041)
- LQ Assignment (This allows you to specify which LQ the SIP port is associated with)
Once this is complete the account should log in, you will see a green tick in the status. This should only take a second to log in – any longer and there is an issue and you will see an error – click on the error icon for the error message.

3. Linking your Eclipse HX matrix to the LQ
In this case I am going to use IP to link the directly into my Eclipse HX E-IPA or IVC-32 card.
My Eclipse HX matrix has an E-IPA card installed. The information I need from this is:
- The IP address of my E-IPA card (or IVC-32) 192.168.42.101

The next thing I need is an LQ SIP port configured on this card and take a note of the IP port options:
- User ID (This is the User ID for the Eclipse HX IP port. The LQ will login to this port)
- Password (This is the Password for the Eclipse HX IP port. The LQ will login to this port)

Program a key to this port on a nearby V series panel so that you can test it later.
On your LQ go to the Accounts page, Select IVC from the left hand side and click the green + to add a new IVC-32 or E-IPA card:
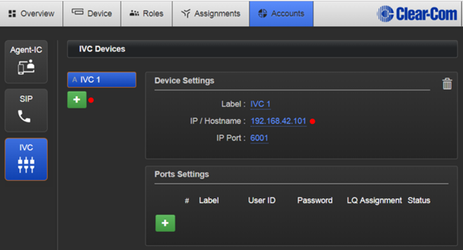
Fill in the following details:
- Label: (This is internal to LQ only)
- IP / Hostname: (This is the IP address of your E-IPA card or IVC-32)
- IP Port: 6001 (This is a default)
Click on the green + under port Settings. Here we will add the details of the port on our E-IPA or IVC-32 card.
- Username: 4041 (From our IP port settings in the Eclipse HX)
- Password: 4041 (From our IP port settings in the Eclipse HX)
NB in this instance I have chosen to use the SIP extension number – this is not necessary, these details only relate to the login to the Eclipse.

4. Creating the internal audio and data link between the SIP account and the Eclipse HX.
Now we must make the audio and data link between the port that is logged into our Yay.com user account and our Eclipse HX IP port.
On your LQ go to the Assignments page>Select Directs
Click the green + to create a new Direct.
The default name is Direct 1. You should change this to something more meaningful. I will call mine SIP Link 4041 so that I know it’s job is to connect my SIP port to my Eclipse HX.
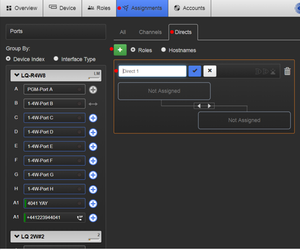
Make the Assignment. You can see on the left hand side all the ports in your LQ. You should remember that port 4041 YAY is the port that logs into our Eclipse HX E-IPA port – we labelled this port 4041 YAY. The port labelled +441223944041 is the Yay.com SIP port – we labelled this with the DDI number associated with our Yay.com user account.
Click the White and Blue cross + to add both these ports to the Direct. They are now linked.
When a call comes in to our SIP number +441223944041 it will immediately be passed into our Eclipse HX system and user tallies will be seen on any panel keys.

CAN'T FIND YOUR ANSWER? CLICK HERE TO CONTACT SUPPORT
This solution was provided to you by Clear-Com via a question submitted to us by customers like you. If your question wasn’t answered, you need help or you have a recommended solution for our database, please send us an email at support@clearcom.com
The information on this page is owned by Clear-Com and constitutes Clear-Com’s confidential and proprietary information, may be used solely for purposes related to the furtherance of Clear-Com’ business and shall not be disclosed, distributed, copied or disseminated without Clear-Com’s prior written consent. Click Here for Clear-Com's privacy statement.